網(wǎng)站首頁(yè) 編程語(yǔ)言 正文
前言
上回我們探討了關(guān)于Spring Security,著實(shí)復(fù)雜。這次咱們聊的認(rèn)證過(guò)濾器就先聊聊認(rèn)證功能。涉及到多方協(xié)同的功能,咱分開聊。也給小伙伴喘口氣,嘻嘻。此外也是因?yàn)橹挥械卿浾J(rèn)證了,才有后續(xù)的更多功能集成的可能。
認(rèn)證過(guò)濾器
認(rèn)證過(guò)濾器是Web應(yīng)用中負(fù)責(zé)處理用戶認(rèn)證請(qǐng)求的。這意味著他要驗(yàn)證用戶的身份,確認(rèn)你是誰(shuí)。只有確認(rèn)用戶身份后,才能授予對(duì)應(yīng)的權(quán)限,才能在后續(xù)訪問(wèn)對(duì)應(yīng)的受保護(hù)資源。因此,在我看來(lái),認(rèn)證過(guò)濾器實(shí)際上需要完成兩個(gè)事情:
- 確認(rèn)用戶身份。
- 授權(quán)。例如,角色。
SpringSecurity沒(méi)有“鑒權(quán)”這概念?
其實(shí)我認(rèn)為前面說(shuō)到的AuthorizationFilter應(yīng)該叫鑒權(quán)過(guò)濾器,在識(shí)別用戶身份后甄別用戶是否具備訪問(wèn)權(quán)限。我刻意找了一下英文,Authentication可以認(rèn)證、鑒定、身份驗(yàn)證的意思,Authorization可以是授權(quán)、批準(zhǔn)的意思。第一眼,竟然有點(diǎn)懵逼。。沒(méi)有上下文的情況下,Authentication可以是認(rèn)證,也可以是鑒權(quán)。而Authorization可以是授權(quán)、也可以是鑒權(quán)(批準(zhǔn)-訪問(wèn))。
得,我一直以來(lái)的疑惑也找到了:為什么Spring Security里面沒(méi)有“鑒權(quán)”相關(guān)概念,而只有認(rèn)證、授權(quán)?如果放到Spring Security的語(yǔ)境中,Authentication就是認(rèn)證的意思,而且還非常準(zhǔn)確,因?yàn)樗€有身份驗(yàn)證的意思。Authorization則是鑒權(quán)的含義,授權(quán)/批準(zhǔn)你訪問(wèn)某個(gè)請(qǐng)求。如果非要區(qū)分開,則還應(yīng)使用Identification作為認(rèn)證這個(gè)概念最為合適。
實(shí)際上,SpringSecurity在獲取用戶信息的時(shí)候就已經(jīng)把用戶的完整信息包括權(quán)限也加載了,所以認(rèn)證也包括了我們?cè)诹募兏拍畹摹笆跈?quán)”。而SpringSecurity的Authorization是“授權(quán)訪問(wèn)”,也就是“鑒權(quán)”。因此,可以說(shuō)在SpringSecurity中只有“認(rèn)證”和“鑒權(quán)”。因?yàn)樗蠹虞d的用戶信息是包括權(quán)限的,跟認(rèn)證在一塊了。別把“授權(quán)”概念跟RABC這些“授權(quán)方式”混為一談了,鄙人就懵圈了好久。關(guān)于授權(quán)和認(rèn)證不妨再回頭看看之前的文章:Spring Security之認(rèn)證與授權(quán)的概念
SpringSecurity支持認(rèn)證方式
Spring Security支持多種認(rèn)證方式:
| 認(rèn)證方式 | 過(guò)濾器 | SecurityConfigurer | 描述 |
|---|---|---|---|
| 基于Basic認(rèn)證 | BasicAuthenticationFilter | HttpBasicConfigurer | 原生支持,開箱即用 |
| 基于Digest認(rèn)證 | DigestAuthenticationFilter | 無(wú),需要自己引入 | 原生支持,開箱即用 |
| 基于OAuth2認(rèn)證-資源服務(wù)器 | BearerTokenAuthenticationFilter | OAuth2ResourceServerConfigurer | 需要spring-boot-starter-oauth2-resource-server包 |
| 基于OAuth2認(rèn)證-客戶端 | OAuth2LoginAuthenticationFilter | OAuth2LoginConfigurer | 需要spring-boot-starter-oauth2-resource-server包 |
| 基于OAuth2認(rèn)證-客戶端 | OAuth2AuthorizationCodeGrantFilter | OAuth2ClientConfigurer | 需要spring-boot-starter-oauth2-resource-server包 |
| 基于CAS認(rèn)證 | CasAuthenticationFilter | 本來(lái)是有Configurer的,4.0之后被棄用,再之后就移除了 | 需要spring-security-cas包 |
| 基于第三方系統(tǒng)認(rèn)證 | AbstractPreAuthenticatedProcessingFilter | - | 用戶在其他系統(tǒng)已經(jīng)認(rèn)證了,在當(dāng)前系統(tǒng)通過(guò)RequestAttribute/Header/Cookie等等方式獲取到用戶名后直接再當(dāng)前系統(tǒng)把用戶信息讀取出來(lái)。 |
| 基于用戶名和密碼認(rèn)證 | UsernamePasswordAuthenticationFilter | FormLoginConfigurer | 原生支持 |
PS: OAuth2比較復(fù)雜,有四種登錄方式,還分客戶端應(yīng)用、用戶、資源。后面有機(jī)會(huì)再細(xì)聊。
基于第三方系統(tǒng)認(rèn)證的方式,也有幾個(gè)原生的實(shí)現(xiàn):
基于J2EE認(rèn)證:J2eePreAuthenticatedProcessingFilter-JeeConfigurer
基于WebSphere: WebSpherePreAuthenticatedProcessingFilter
基于X509證書認(rèn)證:X509AuthenticationFilter-X509Configurer
基于Header:RequestHeaderAuthenticationFilter
基于RequestAttribute:RequestAttributeAuthenticationFilter
以上就是Spring Security原生提供的支持、或者通過(guò)官方的jar包能夠開箱即用的。
基于用戶名和密碼認(rèn)證
好了,下面我們來(lái)重點(diǎn)關(guān)注一下基于用戶名和密碼的認(rèn)證方式。首先我們來(lái)認(rèn)識(shí)一些必要的核心組件:
| 組件 | 作用 | 備注 |
|---|---|---|
| UserDetails | 提供用戶信息,包括權(quán)限 | 提供了默認(rèn)實(shí)現(xiàn):User |
| UserDetailsService | 用于加載裝載用戶信息 | 在認(rèn)證之前需要先根據(jù)用戶名查詢用戶 |
| AuthenticationManager | 負(fù)責(zé)完成認(rèn)證邏輯 | 實(shí)現(xiàn)類ProviderManager |
前面兩個(gè)比較容易理解,無(wú)非就是加載用戶。而后者,對(duì)于ProviderManager而言,相較于我們之前基于方法進(jìn)行權(quán)限配置的方式所使用AuthorizationManager來(lái)說(shuō),無(wú)異于單獨(dú)開辟了一塊新天地。
- ProviderManager
就名字而言,他就是基于AuthenticationProvider來(lái)完成。額,沒(méi)錯(cuò),他就是一個(gè)新的接口,也就是一個(gè)新的組件。而ProviderManager主要的作用就是,根據(jù)Authentication的類型,尋找匹配的AuthenticationProvider,然后調(diào)用匹配的AuthenticationProvider來(lái)完成認(rèn)證。
核心代碼:
public class ProviderManager implements AuthenticationManager, MessageSourceAware, InitializingBean {
	@Override
	public Authentication authenticate(Authentication authentication) throws AuthenticationException {
		Class<? extends Authentication> toTest = authentication.getClass();
		Authentication result = null;
		Authentication parentResult = null;
		int size = this.providers.size();
		// 遍歷所有的AuthenticationProvider
		for (AuthenticationProvider provider : getProviders()) {
			if (!provider.supports(toTest)) {
				continue;
			}
			// 找到第一個(gè)能處理的AuthenticationProvider就執(zhí)行authenticate
			result = provider.authenticate(authentication);
			if (result != null) {
				copyDetails(authentication, result);
				break;
			}
		}
		// 如果認(rèn)證失敗就嘗試由父AuthenticationManager認(rèn)證,這部代碼省略了
		// 認(rèn)證成功則返回結(jié)果
		// 處理異常-省略代碼
	}
}
關(guān)于這個(gè)AuthenticationProvider,我們來(lái)感受一下他的實(shí)現(xiàn):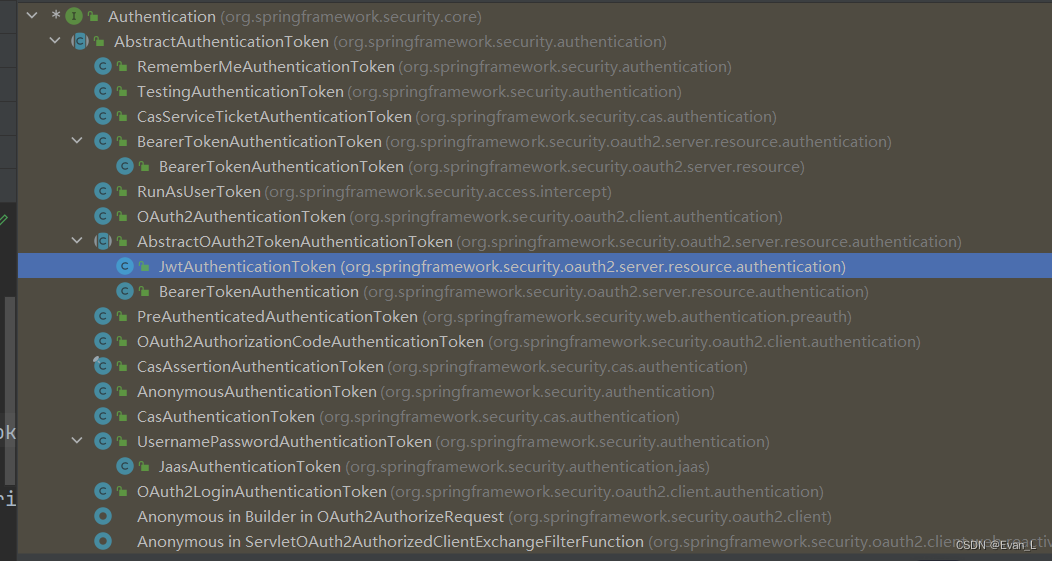
之所以會(huì)有這么多,是因?yàn)锳uthentication有很多,每個(gè)用來(lái)表示憑證的都需要不同的處理,然后才能進(jìn)行認(rèn)證。例如:JwtAuthenticationToken需要將jwtToken解析后就能得到當(dāng)前用戶已經(jīng)認(rèn)證的用戶信息了(OAuth2)。這些實(shí)現(xiàn)有不少是這種類似于token的。不過(guò)我們的用戶名和密碼方式,則是更為復(fù)雜。
public abstract class AbstractUserDetailsAuthenticationProvider
		implements AuthenticationProvider, InitializingBean, MessageSourceAware {

	@Override
	public Authentication authenticate(Authentication authentication) throws AuthenticationException {
		// 1. 獲取用戶名
		String username = determineUsername(authentication);
		// 2. 嘗試從緩存中獲取用戶信息
		boolean cacheWasUsed = true;
		UserDetails user = this.userCache.getUserFromCache(username);
		if (user == null) {
			// 緩存中不存在,則加載用戶:使用UserDetailsService
			user = retrieveUser(username, (UsernamePasswordAuthenticationToken) authentication);
		}
		// 3. 進(jìn)行認(rèn)證:驗(yàn)證用戶狀態(tài)、驗(yàn)證用戶憑證(密碼)
		try {
			// 驗(yàn)證用戶狀態(tài)
			this.preAuthenticationChecks.check(user);
			// 驗(yàn)證用戶憑證(密碼)
			additionalAuthenticationChecks(user, (UsernamePasswordAuthenticationToken) authentication);
		}
		catch (AuthenticationException ex) {
			// 重試
		}
		// 驗(yàn)證成功后,檢查憑證有效期
		this.postAuthenticationChecks.check(user);
		if (!cacheWasUsed) {
			// 緩存用戶
			this.userCache.putUserInCache(user);
		}
		Object principalToReturn = user;
		if (this.forcePrincipalAsString) {
			principalToReturn = user.getUsername();
		}
		// 創(chuàng)建UsernamePasswordAuthenticationToken
		return createSuccessAuthentication(principalToReturn, authentication, user);
	}

	protected Authentication createSuccessAuthentication(Object principal, Authentication authentication,
			UserDetails user) {
		// 構(gòu)建認(rèn)證信息(已驗(yàn)證憑證),里面包含當(dāng)前用戶信息和權(quán)限
		UsernamePasswordAuthenticationToken result = UsernamePasswordAuthenticationToken.authenticated(principal,
				authentication.getCredentials(), this.authoritiesMapper.mapAuthorities(user.getAuthorities()));
		result.setDetails(authentication.getDetails());
		return result;
	}
}

public class DaoAuthenticationProvider extends AbstractUserDetailsAuthenticationProvider {

	@Override
	@SuppressWarnings("deprecation")
	protected void additionalAuthenticationChecks(UserDetails userDetails,
			UsernamePasswordAuthenticationToken authentication) throws AuthenticationException {
		if (authentication.getCredentials() == null) {
			// 沒(méi)有憑證
			throw new BadCredentialsException(this.messages
				.getMessage("AbstractUserDetailsAuthenticationProvider.badCredentials", "Bad credentials"));
		}
		String presentedPassword = authentication.getCredentials().toString();
		// 校驗(yàn)密碼
		if (!this.passwordEncoder.matches(presentedPassword, userDetails.getPassword())) {
			throw new BadCredentialsException(this.messages
				.getMessage("AbstractUserDetailsAuthenticationProvider.badCredentials", "Bad credentials"));
		}
	}
}
現(xiàn)在我們知道用戶是怎么完成認(rèn)證的,還有很重要的一環(huán):認(rèn)證成功之后,用戶信息怎么保存?我們都知道一般保存在Session中。
UsernamePasswordAuthenticationFilter
其核心實(shí)現(xiàn)在父類:
public abstract class AbstractAuthenticationProcessingFilter extends GenericFilterBean
		implements ApplicationEventPublisherAware, MessageSourceAware {
	private void doFilter(HttpServletRequest request, HttpServletResponse response, FilterChain chain)
			throws IOException, ServletException {
		// 當(dāng)前請(qǐng)求是否為認(rèn)證請(qǐng)求
		if (!requiresAuthentication(request, response)) {
			chain.doFilter(request, response);
			return;
		}
		try {
			// 執(zhí)行驗(yàn)證。這是個(gè)抽象方法,由子類實(shí)現(xiàn)。
			Authentication authenticationResult = attemptAuthentication(request, response);
			if (authenticationResult == null) {
				// 沒(méi)有返回結(jié)果,表示子類還沒(méi)有完成。正常情況走不到這里
				return;
			}
			// 執(zhí)行session策略
			this.sessionStrategy.onAuthentication(authenticationResult, request, response);
			// 認(rèn)證成功,執(zhí)行后續(xù)處理
			successfulAuthentication(request, response, chain, authenticationResult);
		}
		catch (InternalAuthenticationServiceException failed) {
			unsuccessfulAuthentication(request, response, failed);
		}
		catch (AuthenticationException ex) {
			unsuccessfulAuthentication(request, response, ex);
		}
	}
	protected void successfulAuthentication(HttpServletRequest request, HttpServletResponse response, FilterChain chain,
			Authentication authResult) throws IOException, ServletException {
		// 1. 將當(dāng)前認(rèn)證信息保存到SecurityContextHolder中,一般是ThreadLocal,以便后續(xù)處理直接使用。
		SecurityContext context = this.securityContextHolderStrategy.createEmptyContext();
		context.setAuthentication(authResult);
		this.securityContextHolderStrategy.setContext(context);
		// 2. 將SecurityContext保存起來(lái),一般是session中。這樣后續(xù)的每個(gè)請(qǐng)求都能從中恢復(fù)當(dāng)前用戶信息,實(shí)現(xiàn)可連續(xù)交互式會(huì)話。
		this.securityContextRepository.saveContext(context, request, response);
		// 記住我功能
		this.rememberMeServices.loginSuccess(request, response, authResult);
		// 發(fā)布認(rèn)證成功事件
		if (this.eventPublisher != null) {
			this.eventPublisher.publishEvent(new InteractiveAuthenticationSuccessEvent(authResult, this.getClass()));
		}
		// 認(rèn)證成功后的處理。與認(rèn)證成功后需要重定向跳轉(zhuǎn)有關(guān)。
		this.successHandler.onAuthenticationSuccess(request, response, authResult);
	}
}

public class UsernamePasswordAuthenticationFilter extends AbstractAuthenticationProcessingFilter {
	@Override
	public Authentication attemptAuthentication(HttpServletRequest request, HttpServletResponse response)
			throws AuthenticationException {
		// 是否為POST請(qǐng)求
		if (this.postOnly && !request.getMethod().equals("POST")) {
			throw new AuthenticationServiceException("Authentication method not supported: " + request.getMethod());
		}
		// 獲取用戶名
		String username = obtainUsername(request);
		username = (username != null) ? username.trim() : "";
		// 獲取密碼
		String password = obtainPassword(request);
		password = (password != null) ? password : "";
		// 構(gòu)建尚未認(rèn)證的token,此時(shí)沒(méi)有權(quán)限
		UsernamePasswordAuthenticationToken authRequest = UsernamePasswordAuthenticationToken.unauthenticated(username,
				password);
		// Allow subclasses to set the "details" property
		setDetails(request, authRequest);
		// 通過(guò)ProviderManager認(rèn)證成功后,也就能獲取到數(shù)據(jù)庫(kù)中保存的權(quán)限了。
		return this.getAuthenticationManager().authenticate(authRequest);
	}
}
認(rèn)證成功涉及的組件
| 組件 | 作用 | 描述 |
|---|---|---|
| SessionAuthenticationStrategy | Session認(rèn)證(成功)策略 | 在用戶認(rèn)證成功后,調(diào)整session;修改sessionId或者重建session |
| SecurityContextHolderStrategy | 為處理當(dāng)前請(qǐng)求的線程提供SecurityContext | 一般是保存在ThreadLocal中 |
| SecurityContextRepository | 為不同請(qǐng)求持久化SecurityContext | 用戶認(rèn)證成功后,主要是為了完成后續(xù)請(qǐng)求。因此需要將SecurityContext持久化。而恢復(fù)ThreadLocal中的SecurityContext,也需要從這里獲取 |
| RememberMeServices | 記住我Service | 在認(rèn)證成功后,若開啟記住我功能,需要生成RemenberMeToken。后面才能使用該Token進(jìn)行認(rèn)證而無(wú)需用戶輸入密碼 |
| AuthenticationSuccessHandler | 認(rèn)證成功后的處理器 | 這是對(duì)于用戶而言的,認(rèn)證成功后需要給用戶呈現(xiàn)什么內(nèi)容/頁(yè)面 |
由于這些都與session管理有著不可分割的關(guān)系,因此,我們留待后續(xù)聊session管理的時(shí)候再說(shuō)。
小結(jié)
- 核心認(rèn)證流程
- 從HttpServletRequest中獲取到用戶名和密碼
- 交給ProviderManager進(jìn)行認(rèn)證。
DaoAuthenticationProvider會(huì)通過(guò)UserDetailsService從數(shù)據(jù)庫(kù)獲取用戶信息,然后驗(yàn)證入?yún)⒌拿艽a。 - 認(rèn)證成功后,創(chuàng)建SecurityContext并保存到ThreadLocal中,同時(shí)將其保存到Session中。當(dāng)然還有其他擴(kuò)展功能,后面再細(xì)聊。
后記
本文中,我們探討了Spring Security的認(rèn)證過(guò)濾器,并從源碼層面分析了UsernamePasswordAuthenticationFilter的原理和處理流程。但是我們并沒(méi)有仔細(xì)探索認(rèn)證成功之后的操作。因?yàn)檫@些涉及到Session管理,這就與另一個(gè)過(guò)濾器SessionManagementFilter有著密不可分的關(guān)系了。所以下次,我們就聊SessionManagementFilter。屆時(shí)會(huì)仔細(xì)說(shuō)說(shuō)。
參照
01 認(rèn)證、授權(quán)、鑒權(quán)和權(quán)限控制
Authentication
JAAS 認(rèn)證
【揭秘SAML協(xié)議 — Java安全認(rèn)證框架的核心基石】 從初識(shí)到精通,帶你領(lǐng)略Saml協(xié)議的奧秘,告別SSO的迷茫與困惑
原文鏈接:https://blog.csdn.net/Evan_L/article/details/136858386
- 上一篇:沒(méi)有了
- 下一篇:沒(méi)有了
相關(guān)推薦
- 2022-05-07 MVC中Action方法的返回類型介紹_基礎(chǔ)應(yīng)用
- 2022-09-18 Go實(shí)現(xiàn)文件分片上傳_Golang
- 2022-04-30 .Net?生成壓縮文件問(wèn)題記錄(推薦)_實(shí)用技巧
- 2022-05-08 Python?matplotlib實(shí)現(xiàn)折線圖的繪制_python
- 2023-05-20 python中split(),?os.path.split()和os.path.splitext()
- 2023-03-01 Shell腳本read用法實(shí)現(xiàn)_linux shell
- 2022-09-30 oracle表空間不足ORA-01653的問(wèn)題:?unable?to?extend?table_or
- 2023-02-10 docker的鏡像存放地址在哪里_docker
- 欄目分類
-
- 最近更新
-
- window11 系統(tǒng)安裝 yarn
- 超詳細(xì)win安裝深度學(xué)習(xí)環(huán)境2025年最新版(
- Linux 中運(yùn)行的top命令 怎么退出?
- MySQL 中decimal 的用法? 存儲(chǔ)小
- get 、set 、toString 方法的使
- @Resource和 @Autowired注解
- Java基礎(chǔ)操作-- 運(yùn)算符,流程控制 Flo
- 1. Int 和Integer 的區(qū)別,Jav
- spring @retryable不生效的一種
- Spring Security之認(rèn)證信息的處理
- Spring Security之認(rèn)證過(guò)濾器
- Spring Security概述快速入門
- Spring Security之配置體系
- 【SpringBoot】SpringCache
- Spring Security之基于方法配置權(quán)
- redisson分布式鎖中waittime的設(shè)
- maven:解決release錯(cuò)誤:Artif
- restTemplate使用總結(jié)
- Spring Security之安全異常處理
- MybatisPlus優(yōu)雅實(shí)現(xiàn)加密?
- Spring ioc容器與Bean的生命周期。
- 【探索SpringCloud】服務(wù)發(fā)現(xiàn)-Nac
- Spring Security之基于HttpR
- Redis 底層數(shù)據(jù)結(jié)構(gòu)-簡(jiǎn)單動(dòng)態(tài)字符串(SD
- arthas操作spring被代理目標(biāo)對(duì)象命令
- Spring中的單例模式應(yīng)用詳解
- 聊聊消息隊(duì)列,發(fā)送消息的4種方式
- bootspring第三方資源配置管理
- GIT同步修改后的遠(yuǎn)程分支
 提供CDN加速