網站首頁 編程語言 正文
由于業務場景的復雜性,需實現:在 el-table 表格中 嵌入 el-checkbox 多選框 及 el-input 輸入框 及 el-upload 上傳組件 ,先附上實現效果圖。
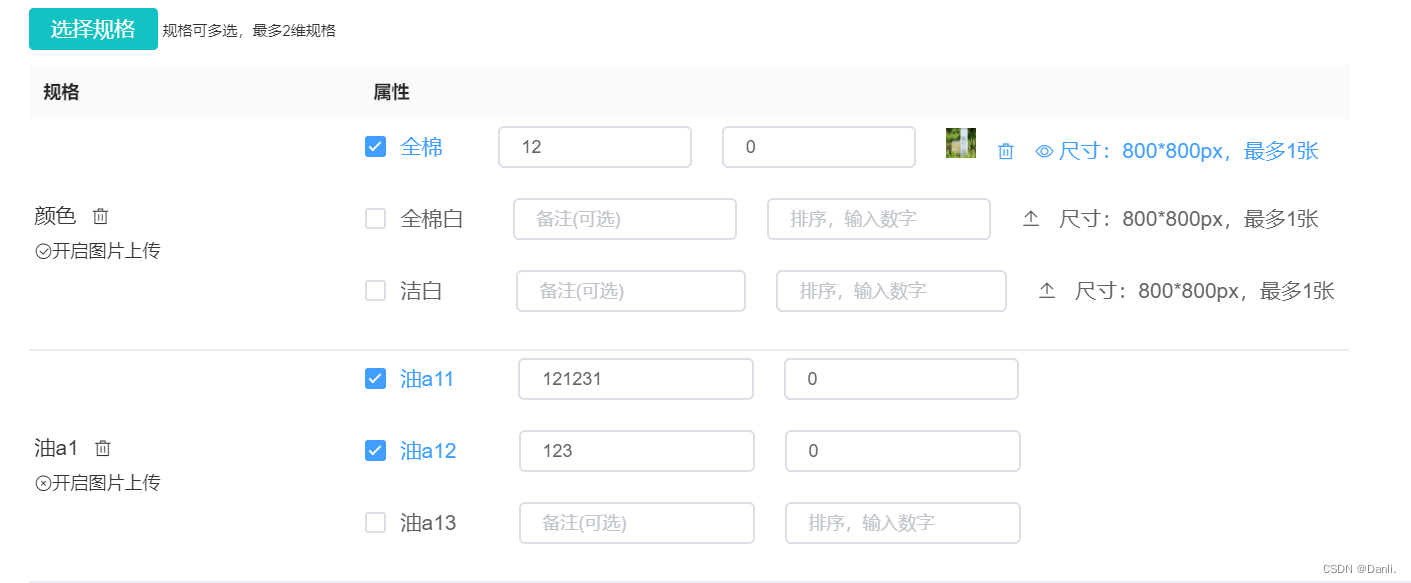
從圖片可以看出其實就是一個規格可以帶有多個屬性的規格表,實現此效果需涉及到的知識點大概有以下:
- 阻止冒泡
- this.$set() 動態綁定
- 圖片上傳,預覽
- Scoped slot 獲取到 table 內部的狀態管理數據
- …
首先搭建表格框架(固定兩列),這個比較簡單
<el-table>
	<el-table-column
         prop=""
         label="規格"
         width="220px">
    </el-table-column>
    <el-table-column
         prop=""
         label="屬性"
         width="660px">
    </el-table-column>
</el-table>
由于行數不固定,行內容非普通的靜態數據展示,故需用到 slot 來自定義
:data 屬性綁定 commodityPropertyList數據,scope 獲取 row, column, $index 和 store 等的表格內部數據
實現表格第一列
<el-table
	:data="commodityPropertyList"
	style="width: 100%"
	>
	<el-table-column
         prop=""
         label="規格"
         width="220px">
         	<template slot-scope="scope">
         		<span style="font-size: 14px;">{{scope.row.propertyName}}</span><i style="margin-left: 10px;" class="el-icon-delete" @click="deleteProperty(scope)" ></i>
         		<div style="display: flex;align-items: center;cursor: pointer;" class="property" @click="changeGPicFlag(scope)">
         			<i  v-if="scope.row.gPicFlag == 1" class="el-icon-circle-check"></i>
         			<i class="el-icon-circle-close" v-else></i>
         			<div>開啟圖片上傳</div>
         		</div>
         	</template>
    </el-table-column>
    <el-table-column
         prop=""
         label="屬性"
         width="660px">
    </el-table-column>
</el-table>
補充表格第二列
<el-table
	:data="commodityPropertyList"
	style="width: 100%"
	>
	<el-table-column
         prop=""
         label="規格"
         width="220px">
         	<template slot-scope="scope">
         		<span style="font-size: 14px;">{{scope.row.propertyName}}</span><i style="margin-left: 10px;" class="el-icon-delete" @click="deleteProperty(scope)" ></i>
         		<div style="display: flex;align-items: center;cursor: pointer;" class="property" @click="changeGPicFlag(scope)">
         			<i  v-if="scope.row.gPicFlag == 1" class="el-icon-circle-check"></i>
         			<i class="el-icon-circle-close" v-else></i>
         			<div>開啟圖片上傳</div>
         		</div>
         	</template>
    </el-table-column>
    <el-table-column
         prop=""
         label="屬性"
         width="660px">
         	<template slot-scope="scope">
         		<el-checkbox-group v-model="checkPropertyList">
         			<el-checkbox v-for="(item1,index) in scope.row.options"   :label="item1" :key="item1.id" :disabled="pageType == 'view'">
         				<div  style="display: flex;justify-content: center;align-items: center;margin-bottom: 20px;">
         					<div style="width: 50%;font-size: 14px;">{{item1.optionValue}}</div>
         					<el-input :disabled="pageType == 'view'" style="margin-right: 20px;" size="mini" v-model="item1.optionAlias" placeholder="備注(可選)"></el-input>
         					<el-input :disabled="pageType == 'view'" size="mini" v-model="item1.optionSort" placeholder="排序,輸入數字"></el-input>
         					<span v-if="scope.row.gPicFlag == 1" style="margin-left: 20px;">
         						<div v-if="item1.gPicUrl" style="display: inline;">
         							<el-image ref="preview2"  :preview-src-list="[showgPicUrl]" style="width: 20px;height: 20px;" :src="item1.gPicUrl"></el-image>
         							<i @click.stop.prevent="deleteImage(scope,index)" v-if="pageType != 'view'"  style="margin-left: 10px;font-size: 12px;" class="el-icon-delete" ></i>
         							<i style="margin-left: 10px;font-size: 12px;" @click.stop.prevent="previewImage2(scope,index)" class="el-icon-view"></i>
         						</div>
         						<el-upload v-show="!item1.gPicUrl && pageType != 'view'" ref="upload" class="insert-block"
                                      style="display: inline-block; vertical-align: top; margin-right: 8px;"
                                       action="/api/mdm/upload/image" :limit="1"  accept=".jpg,.jpeg,.png"
                                       :on-success="handleSuccess2" :on-error="handleFormatError"
                                          :file-list="imgFilesListOfOnce" :show-file-list="false">
                                           <i slot="default" @click.stop.prevent="uploadImage(scope,index)" class="el-icon-upload2"></i>
                                 </el-upload>
                                 <span>尺寸:800*800px,最多1張</span>
         					</span>
         				</div>
         			</el-checkbox>
         		</el-checkbox-group>
         	</template>
    </el-table-column>
</el-table>
到此,表格的頁面及樣式已基本完成,接下來還需處理事件邏輯。
表格第一列事件處理
changeGPicFlag(scope) {
     if(this.pageType == 'view') {
          return
      }
     this.commodityPropertyList.forEach((item,index) => {
          if(index == scope.$index) {
               item.gPicFlag = item.gPicFlag == 1 ? 0 : 1
          }
      })
          this.commodityPropertyList = [...this.commodityPropertyList]

}
表格第二列事件處理
deleteImage(scope,index) {
          this.commodityPropertyList[scope.$index].options[index].gPicUrl = ""
          this.commodityPropertyList = [...this.commodityPropertyList] //實時更新修改的數據
},

previewImage2(scope,index) {
      this.showgPicUrl = this.commodityPropertyList[scope.$index].options[index].gPicUrl
      this.$refs.preview2[0].showViewer = true
},

uploadImage(scope,index) {
      let num = 0
      let list = []
      list = this.commodityPropertyList.filter((item,index) => index < scope.$index)
      list.forEach(item => { num += item.options.length})
       //阻止冒泡到選checkbox
      this.upload2Flag.propertyIndex = scope.$index
      this.upload2Flag.optionsIndex = index
      this.$refs['upload'][num+index].$refs['upload-inner'].handleClick()
},
表格“屬性”列由 多選框checkbox、輸入框input、 圖片上傳upload 等組件組成,從代碼可看出 checkbox-group 包裹 input等組件,所以當在輸入框輸入或點擊上傳圖片等操作時,都會觸發勾選/取消勾選多選框。這效果不是我們想要的,我們只是想操作上傳圖片,所以需要在定義事件時加
@click.stop.prevent = 事件名來阻止冒泡(阻止觸發勾選操作)
于是又有問題出現了,當在 el-upload 組件加上 @click.stop.prevent = 事件名 時,你會發現,操作點擊時不會觸發彈出選擇文件窗口,這是因為加了阻止冒泡后沒有觸發到選擇文件的操作,這就需要我們自己在事件處理中寫邏輯去觸發。
1.需要在 el-upload 組件定義 ref
2.用 index 結合 num 找出被點擊的那個 el-upload 組件
    uploadImage(scope,index) {
       let num = 0
       let list = []
       list = this.commodityPropertyList.filter((item,index) => index < scope.$index)
       list.forEach(item => { num += item.options.length})
         //阻止冒泡到選checkbox
       this.upload2Flag.propertyIndex = scope.$index
       this.upload2Flag.optionsIndex = index
       this.$refs['upload'][num+index].$refs['upload-inner'].handleClick()//觸發選擇文件的彈窗
 },
在實現的過程中,我還碰到一個輸入框不能輸入的問題,我操作輸入之后,沒有動靜,再點擊勾選操作時就可以正確顯示出來了。于是我猜想了很多種可能并一一去驗證
1.el-checkbox 不能包裹其他標簽?(從網上搜集到很少有這樣復雜地使用多選框)
2.沒有加 slot-scope="scope" ?
…
最后在控制臺打印后端返回的 commodityPropertyList 數據中發現,其 options 數組下沒有 optionAlias 和 optionSort 字段,需要前端這邊自己加,最開始我是這樣加的
//在commodityPropertyList獲取數據的地方
......
this.commodityPropertyList.forEach((group) => {
      if (group.options && group.options.length) {
             group.options.forEach((item) => {
                 item.optionAlias = ""
				 item.optionSort = ""
                  var key = item.propertyCode + ":" + item.optionCode
                  var prop = this.propSpenMap.get(key)
                     if (prop) {
                           group.gPicFlag = prop.gPicFlag == 1 ? 1  : 0
                           propList.push(prop)
                           this.checkPropertyList.push(item)
                     }
             })
        }
})
最后發現還是不可以,于是我嘗試 this.$set() 就可以了,是因為 v-model 需要雙向綁定,而 this.$set() 則是啟用了動態綁定
將上面代碼的
item.optionAlias = ""
item.optionSort = ""

改成
this.$set(item,'optionAlias',"")
this.$set(item,'optionSort',"")
原文鏈接:https://blog.csdn.net/weixin_45680114/article/details/134446538
- 上一篇:沒有了
- 下一篇:沒有了
相關推薦
- 2022-02-24 forEach直接改變原數組對象中的某一個屬性
- 2023-08-01 elementui自定義Slider樣式
- 2022-04-09 C#實現計算器精簡版_C#教程
- 2022-07-19 Python數據分析?Numpy?的使用方法_python
- 2023-07-03 python?遍歷可迭代對象的實現方法_python
- 2022-08-13 在配置mybatis時報找不到xml文件,或者xml找不到對應方法的坑
- 2022-03-14 sql 排序order by重復數據問題
- 2022-04-01 使用Git clone代碼失敗的解決方法
- 欄目分類
-
- 最近更新
-
- window11 系統安裝 yarn
- 超詳細win安裝深度學習環境2025年最新版(
- Linux 中運行的top命令 怎么退出?
- MySQL 中decimal 的用法? 存儲小
- get 、set 、toString 方法的使
- @Resource和 @Autowired注解
- Java基礎操作-- 運算符,流程控制 Flo
- 1. Int 和Integer 的區別,Jav
- spring @retryable不生效的一種
- Spring Security之認證信息的處理
- Spring Security之認證過濾器
- Spring Security概述快速入門
- Spring Security之配置體系
- 【SpringBoot】SpringCache
- Spring Security之基于方法配置權
- redisson分布式鎖中waittime的設
- maven:解決release錯誤:Artif
- restTemplate使用總結
- Spring Security之安全異常處理
- MybatisPlus優雅實現加密?
- Spring ioc容器與Bean的生命周期。
- 【探索SpringCloud】服務發現-Nac
- Spring Security之基于HttpR
- Redis 底層數據結構-簡單動態字符串(SD
- arthas操作spring被代理目標對象命令
- Spring中的單例模式應用詳解
- 聊聊消息隊列,發送消息的4種方式
- bootspring第三方資源配置管理
- GIT同步修改后的遠程分支
 提供CDN加速